Lightroom CC: Unlocking the Power of the Basic Tab (2024)
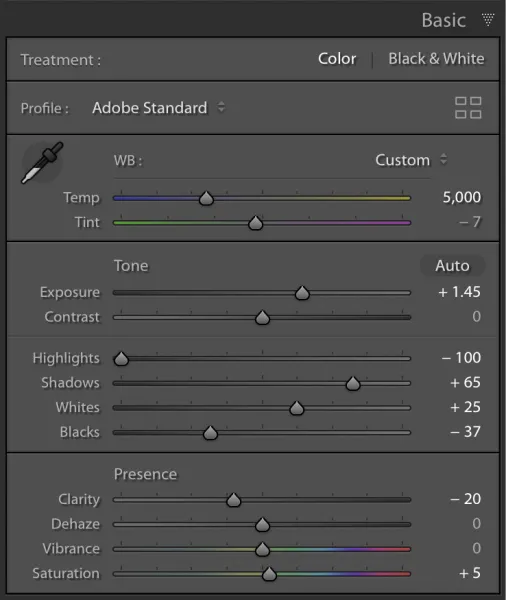
Lightroom Classic is the most popular editing software launched by Adobe. The Basic tab is a very useful module of Lightroom CC. It gives you access to various tools. These tools include exposure, contrast, highlights, shadows, whites, blacks, clarity, vibrance, and saturation etc. You can do 90 per cent of your editing in this tab. In this tutorial, you are given information about all the tools that the basic tab contains. By reading it you will be able to easily understand the workings of these tools and perform your editing activities better.

Where to find the Basic tab in Lightroom cc
The first difficulty any new user may face is where are the main tabs.
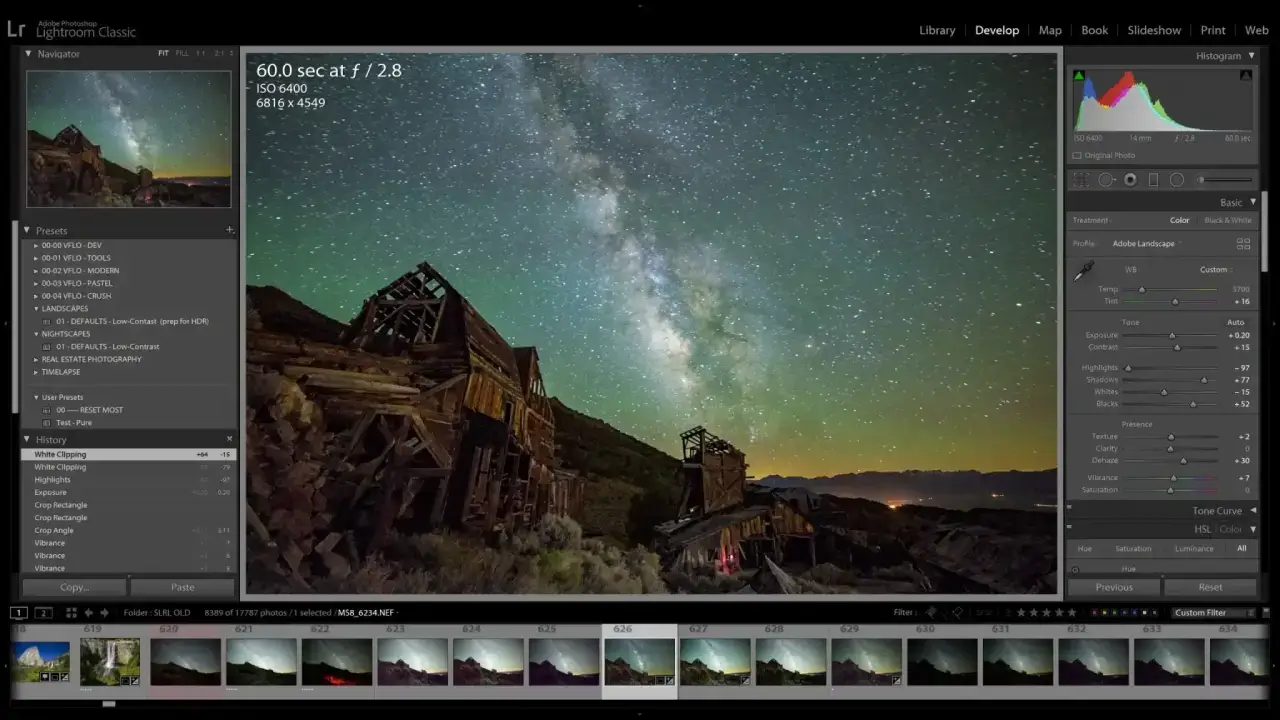
So after opening Lightroom cc, you can see some modules at the top of the screen. The Basic tab is located below the histogram display on the right side of the Develop module.
This panel consists of three different parts. First is white balance, second is tone and third is presence. We are going to talk about them in detail in the article

The Settings
In Lightroom Mobile these sittings are available with the same name.
Treatment:
In the Basic tab of Lightroom CC, the treatment settings allow you to make adjustments to your photo’s overall look and feel. You have two settings, First one is Color, which keeps your image in color and second is black and white, Which sets the brighter and darkest areas of your image. By these settings, you can enhance the overall tone, contrast, and colors of your image.
White balance:
You can also use “auto” sitting to get WB in your image in Lightroom cc. Auto will automatically set the WB in your image.
Also, you can use the slider. Moving the slider to the right will increase the brightness, and moving the slider to the left will decrease the brightness. The correct color values can be added to the image by using the slider.
However, you can use eye drops to set WB. The eye drop is next to the WB slider. You’ll select this tool with one click and move it to a point above the image that will be light white.
As you move it over a lighter white area in the image, the different color values, called RGB, will appear. Click the image when the color value is close to 75. This tool will create WB according to your image. You can adjust its temperature and color later if you want. This tool adds the best color value to the images that are captured in the light.
Temperature:
Each image is a combination of different tones and colors. This tool is used to adjust the warm and cool tones in the image. If you feel the need for a cooler tone in image, move the slider to the left.
By doing this, this tool will give your image a blue color. If the image requires a warmer tone, then move the slider to the right, which will make your image appear yellow. Temperature change is one of the most significant advantages offered by the RAW image format over JPEG in Lightroom cc.
Tint:
Due to temperature, some unnecessary colours may appear in the image. With the help of Tint, you can correct the cast of these colours. Tint Tool works in conjunction with Temperature.
You can move the slider from right to left to balance the colour. When the slider is moved to the right, the magenta colour will appear. Moving left and right will highlight the green color. Move the slider until you get the perfect color balance in the image. This is a useful tool for getting the desired color tones in your photos.
Tone:
By clicking on auto, the software will automatically work on the image. Exposure, Contrast, Highlights, Shadows and Whites will be set automatically. But you must know the function of all the tools in Tone.
Exposure:
To get the right tone in your image, you have to know exposure first. Exposure controls the lights in the image. This tool affects the entire image at once.
Sliding the slider to the right will make the entire image white. Moving to the left will cover the entire image with dark. In simple words, this tool is used to increase the overall brightness and darkness of the image.
This tool can be used to balance colors when images are under or overexposed.
Highlights and shadows:
This tool works on the detail of the image. If you slide the Highlight slider to the left, you will notice that it dark parts of the image have become more darker. Similarly moving it to the right will make the bright parts brighter. For example, if there is an image that contains the sky and buildings.
If you want the image to show the details of the sky, you need to reduce the highlights. Highlights are usually kept to a minimum. With the help of shadows, you can give detail to the dark area in the image. Full image detail is achieved by sliding the highlights slightly to the left and the shadows to the right. Doing so will make the dark parts of the image brighter and the brighter parts darker.
White and black:
White and black tools can also be auto-adjusted. (press shift and double click on black and whites for auto adjusting)If we talk about the white tool, it is similar to highlights. To use whites and blacks in the picture, press Alt and drag the slider to the right side. When you move the slider to the right, some colors will appear on the screen. You have to stop the slider as soon as the colors appear. You just have to move the slider until the colors appear. This process is called clipping.
Clipping is about detail within an image.
If you slide the white slider too far to the right, the image will lose all quality at brightness over a specific point because there will be less detail. So during this process, when other colors appear on the screen, you have to stop there. And you can do the same thing with the black tool, the only difference is that after alt-clicking on it, you have to move the slider. To move to the left.
Presence:
Clarity:
One of my favorite tool in Lightroom CC. It is used to improve the details in the image. You can use this tool to sharpen the subject in the photo or to clarify the blurred objects. As you move the Clarity slider to the right, the details of the image will become more apparent. And when you move it to the left, it will affect the blurred part of the image. This tool helps to organize image details in sync. You also can use Clarity slider for Blur Background in lightroom.
Vibrance:
Vibrance saturate those areas in the picture which are not completely saturated.
vibrance enhances the colors where color is needed in the image. By sliding the slider to the right, colors will be darker in the part of the image where the color is needed – these colors will not appear throughout the image. Nor will this tool color cast the entire image. Similarly, if you move it to the left, the colors will be much less dark.
Saturation:
The Saturation slider in Lightroom CC allows you to adjust the intensity of colors in your photo. When you move the slider to the right, it increases the saturation, making the colors more vibrant and vivid. Moving the slider to the left decreases the saturation, resulting in more muted or desaturated colors. It’s a simple yet powerful tool to enhance the overall look and feel of your image. Give it a try and see how it can make your colors pop!
Conclusion
Basic tab in Lightroom CC is a fundamental tool for editing your photos. It allows you to make adjustments to the exposure, contrast, highlights, shadows, and more. By utilizing these settings, you can enhance the overall look and feel of your images, making them more vibrant and dynamic. Remember to experiment and find the perfect balance that suits your personal style. Have fun exploring the Basic tab and transforming your photos into stunning works of art. For more information you can contact us.
